Showing posts with label gardening. Show all posts

Saturday, June 20, 2009

Pickin' and Grinnin'

I'm thrilled to have picked a bunch of good stuff from the garden today. And, it's mostly already prepped and ready to eat. And, I'm really happy to report that I picked my first sungold cherry tomatoes! Got about a quarter pound and ate them right away. Mega yum. I'm looking forward to my first fresh basil of the year as well.

I made a curried potato salad. It tastes great, and it's McDougally delicious. It's adapted to be lowfat and vegan and comes from the San Francisco Chronicle Website. The peas, onions, and hot pepper were all grown in the meadow. Fresh and local!

Curried Potato Salad with Peas

Serves 6
From former Chronicle staff writer Robin Davis, now food editor at the
Columbus Dispatch.

INGREDIENTS:
1 pound unshelled fresh peas
Salt to taste
3 pounds small white creamer potatoes, quartered
1 cup unsweetened soy yogurt (I used Wildwood brand - nice and tangy)
1 teaspoon white wine vinegar
1 teaspoon curry powder
1/8 teaspoon cayenne pepper
3 tablespoons chopped mint leaves
Freshly ground pepper to taste
1 small red onion, chopped

INSTRUCTIONS:
Shell the peas; discard pods. Cook the peas in a small pot
of boiling salted water until tender; it will take from 10 to 30 minutes
depending on the maturity of the peas. Drain. Cool.
Steam the potatoes until just tender, about 15 minutes. Cool.
Whisk together the yogurt, vinegar, curry powder and cayenne. Stir in 2
tablespoons of the mint. Season with salt and pepper.
Combine the peas, potatoes and onion in a large bowl. Add the dressing and
toss to coat. Sprinkle with the remaining 1 tablespoon mint.


I also made wilted cucumber salad and grilled some round zucchini. Luckily, the zucchini finished cooking just as the propane tank ran out of gas. Now I just have to wait for my hubby to finish cutting the grass and we'll be eating some good lunch!

Tuesday, June 16, 2009

The Squash Parade Begins

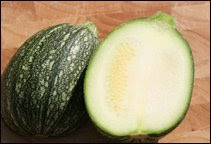
The march of the summer squash officially began last evening, when I harvested 3/4 of a pound (inclusive of some squash blossoms, which are also edible and yummy) of round zucchini. The seed packet caught my eye at Big Lots recently, and for a buck, why not try something new? I planted a few seeds in little hills three feet apart, mulched the whole thing heavily, watered, and waited. These bush-type plants are doing wonderfully. I also randomly planted some of these seeds in a flower bed. Of course, those plants are bigger than the plants in their own squash bed. What's up with that?

This photo is from seedfest.co.uk, as I need to charge my camera.


I picked a small bowlful of small, slightly larger than golfball size zukes, along with male blossoms. You can tell the blossoms are male if they are on a long stem. Female blossoms have a tiny baby squash-ette attached. Leave those until they are of harvesting size.

I simply prepared the veggie of the day by trimming off the ends and slicing the small orbs in half. Then, I steamed them until they were nice and tender. At the last minute or so, I added the squash blossoms, stamens removed and discarded, blossoms sliced into thin strips.

Bring on the parade!

Monday, June 8, 2009

Doing the Weave

So far, I have 36 tomato plants in one really long bed. Some of the varieties are:
  • Cherokee Purple
  • Sungold Cherry
  • German Johnson
  • Celebrity
  • Roma
  • Better Boy
Thirty-six plants are quite a few tomatoes. Rather than get caught up with staking each one and trying to keep up with tying the plants (and inevitably falling behind quickly in that task each year), or spending too much money on flimsy round wire cages that are useless once the plants grow higher than three feet, or the welds break, I am on the second year of a system used by commercial growers. (I think that is one really long sentence I just typed!)

This system is called the Florida weave. I've also seen mention of the German weave. Maybe so, since Germans are known to be so efficient at things (and I'm of German descent, so occasionally it rubs off). Basically, five to six foot long wooden stakes or metal posts are driven into the ground, spaced so two plants are between each stake. My stakes are five feet long. The stakes at the end of each row should be at an angle, away from the plants. Think of the letter "v" for the direction the end stakes will face. You'll also need a spool of heavy jute twine.

So, to get started, drive the stakes into the ground with a mallet. If using wood stakes, wear heavy gloves, so you don't get splinters. This is strenuous work. Enlist a good helper if you aren't too strong yet. Last year, I had my hubby do this work for me. I was able to do it myself this time around, thanks to all the CrossFit workouts I have been doing since January. Still, it's hard work, but you want the stakes to be firmly anchored into the ground. Your plants should be spaced anywhere from 18 to 36 inches apart, depending on soil quality. I have pretty good soil, thanks to all the manure from my neighbors' horses, so I space my tomato plants 18 inches apart. The rows are about three feet apart. I have found it's best to plant the tomatoes first, and then drive the stakes and weave the twine. Also, mulch heavily while the plants are small, and this will help keep the soil moist and cool as the weather heats up (and heat up it does, here in central NC).

After getting the stakes in, tie a firm knot about six inches from the ground at the end of the row, on the outward angled stake. I also like to wrap the twine around the stake a few times. Then, unravel the twine and run it to the next stake, holding the twine taught,and wrap it around the next stake firmly. Continue to the subsequent stakes in the row, until you get to the end. Then, wrap the twine around the end stake, and come back down the row. When you get back to the starting point, wrap again, and firmly tie off the twine and cut. Repeat up the stakes, about every six inches, until you get to the top of the stakes.

As the plants grow, all you need to do is visit the plants every couple days and tuck the growing tip between the two lines of the twine. It will only take a few minutes. This is a fast, easy, and inexpensive way to support your tomatoes. At the end of the season, remove the stakes from the ground, and store them in a dry place. Then, you can reuse them next year. The twine can go in the compost bin as a source of carbon.

Different varieties of tomato plants in various stages of growth.

Close-up of the method at work.

Monday, April 27, 2009

Garden Prepping

We had a gorgeous weekend in central NC. Summer heat without the humidity. We kicked things off with an early morning 5K run in Chapel Hill. I’m a volunteer coach with the Fleet Feel No Boundaries running program. I help women who have never run get from 0 to 5K (3.1 miles) over the course of weeks. My specialty is coaching the back of the pack runner (being one myself!). I love being able to help instill confidence in a person to do what they thought they could not – break the boundaries they have set for themselves.

Then, it was breakfast at a local diner, then back home to work in the garden. We got some veggie beds tilled, weeds pulled, and started work on a new flower garden in an area where we used to have a beautiful oak tree. The tree was well over 100 years old when it had to be cut down. We were heartbroken about it. It had a large vertical split – a result of severe ice storm damage, and a heavy ant infestation didn’t help. The tree was taken down several years ago (and we used the wood to heat our house for two years). The area where the stump was ground down was becoming pretty crappy looking – the residual underground stump and roots have been rotting, causing sinking spots in the yard. Nothing was really growing nicely. Hubby had the gumption to plot out a nice kidney bean shaped area to beautify. He started tilling and raking and moving grass, rocks, etc. I even got in on the action and helped pry up roots and rocks (yay, CrossFit – the workouts are paying off). This was some HOT work. On Sunday, hubby made a beautiful border with rocks that were bordering other beds. Now we will add some well composted horsey poo and top-soil. I’d like to grow sunflowers this year, eventually establishing perennials that don’t require a lot of water. I’m thinking Mediterranean.

Just getting started.


Almost done - taking a break!

Another fun activity was the Farm Tour. North Carolina has an abundance of small to large growers. Organic and biodynamic farmers, CSAs, farmers’ markets, etc., really do well here. The farm tour allows the public to visit working farms and connect with the farmer on a more personal level than even a visit to one of our many area markets allows. Due to our already packed schedule, we only got to visit three farms. My favorite was a farm that intensively plants on ¼ acre. We also had the opportunity to purchase tomato plants at this farm. We picked up 20 plants: Celebrity, Sun Gold (my favorite cherry tomato), German Johnson, and Cherokee Purple. I learned something at each farm we visited.


Harvest: I picked half a pound of red radishes. They have a nice sharp flavor. I used some in a veggie slaw: collards, cabbage, carrot, radish. The dressing was veganaise and ume plum vinegar with some mustard seeds and celery seed. Very delicious.

Monday, April 20, 2009

Peas, Glorious Peas


Pea plants, that is. I planted a bed of peas on February 15 with my Earthway Seeder. The seeder saves a lot of time and backbreaking effort when planting large quantities of seeds. The pea patch is about three feet by 15 or 20 feet long. The plants are growing nicely and are about 18 inches high. Just saw some blossoms starting to form. Fresh peas are delicious. I still have some in the freezer from last year.

The rear-tine roto-tiller we picked up on Craigslist is repaired (belt was dry-rotted and snapped on the first use but the engine runs great). Looking forward to getting some new beds tilled. Yes, the lasagna method of building new beds is great (have used it many time and continue to use it), but I have a very large yard, work 40+ hours a week at my job, so I'm willing to use machines to get the big jobs done. I have the skills and the tools (gotta love that Craigslist) to work by hand should that need ever arise, but I prefer to use my time to the greatest advantage. No apologies on not wanting to make things excessively hard on myself. I'm also not 20 years old. ;)

Wednesday, April 8, 2009

Someday I will Plant My Garden

Here in central North Carolina, I will someday have a garden, as I have for years. This year, it's taking so much longer to get things going. Yes, it's only April 8. I do have some peas growing, and some spinach and carrots are finally deciding to grow (after sowing those seeds on February 15). Brocolli and cabbage transplants bought it after several nights of unseasonably late hard freezes. And, I never got around to replanting. Then, the rains came, and it rained down from the heavens for days at a time, leaving the ground beyond saturated. Then we had a snowstorm at the beginning of March - the poor daffodils! Then it rained again for days, saturating the ground once more. I'm itching to plant something!


Source of the free fertilizer for the garden!


Wednesday, July 2, 2008

I think I just need to do this.

OK, so I came up with a fun little name for my blog and all kinds of big ideas. Then the writer's block hit me hard. Or was it all the great ideas swirling around my noggin? I was going to write this long dissertation about how I came to the blogosphere, organize by topic, amaze you with my common sense knowledge, and so on.

Know what? I'm full of crap. I think I'll just start jotting some ideas and see where it goes.


So here I go...


Hmm..


Well...

Sigh. I am going to get some water...


OK, I'm back.
Let's see....

OH! I know.
I like to garden. Right now it's summer here in the Southeastern US. The price of EVERYTHING is up, and people are growing food. I'm one of those people. I have a big property, not huge, but a good sized .81 acre. I can put a lot of space into food production. Each year, I try to increase the garden size and become more efficient. I'll post more on the garden as I go along in the days and weeks to come.

Garlic
was one of the first things I've harvested this year. It's an easy, almost foolproof (at least for this fool) crop to grow. It was super easy to get started: Back in November of last year, I went to the local natural foods coop and purchased a few bulbs of organic garlic. I broke the bulb into the individual cloves and planted them, root (fat) side facing downward in the prepared planting bed. They were spaced about six inches apart in rows about six to ten inches apart. I watered and mulched with chopped up leaves, and waited... Spring sprung, and so did the garlic. I fertilized it a few times and kept waiting. My patience was rewarded with a bounty of garlic in mid June when the leaves started to die back. All I had to do was pull out the now big bulbs. I need to weigh it to get the final tally. Here's the freshly harvested garlic. I used some of the green parts for cooking, but the garlic cures better and keeps longer if the leaves are left on. Curing? What's that? Well, after the garlic is harvested, it needs to be kept in a warm, dry place for a few weeks so it will store and last a while. So, cure I did, on a large window screen that I picked up for free at a local trash transfer station (us folks who don't live in the city limits either have to pay for trash removal or haul to a transfer station and toss the trash into Dumpsters. The transfer station has a salvage shed, where you can leave things you don't want and others can take them for free. That's another post for another day). OK, this is getting fun! I placed the window screen on top of a clothes drying rack upstairs in my finished attic, which also doubles as a handy boudoir. Now, three weeks later, I have me some cured garlic. So, there we have it. Garlic. And, it does not smell strongly of garlic upstairs.

UPDATE: I just trimmed and weighed the garlic. I got 27 bulbs with a total weight of 2.75 pounds. That should keep me cooking for a while.